The Tiny Kitchen Playbook: How to Style, Store, and Survive in Under 120 Square Feet
Tiny kitchen design isn’t about cramming a normal kitchen into a smaller footprint — it’s about editing ruthlessly and using every vertical inch you’ve got. I learned that the hard way in a 52-square-foot Brooklyn galley where my “essential” stand mixer lived on top of the fridge for two years before I admitted I used it twice a year.
If your counter is buried, your cabinets are chaos, and the whole room feels like it’s closing in on you, this is the fix. No knocking down walls. No pretending you’ll suddenly become a minimalist who owns four plates.
What This Style Is and Who It’s For
The look I’m walking you through is functional-first small-space styling — pieces earn their keep, surfaces stay mostly clear, and the decor that survives the cut tends to be the stuff you actually use.
It works in:
– Galley and corridor kitchens (35–80 sq ft)
– L-shaped and U-shaped apartment kitchens (60–120 sq ft)
– Kitchenettes in studios, ADUs, basement suites, vanlife builds (as little as 20 sq ft)
– One-wall kitchens in open-plan studios where the kitchen is visible from the couch
If you’ve got under 10 linear feet of counter and you cook more than three times a week, you’re the target reader.
Time and Money: What This Actually Costs
Basic restyle, no renovation: 1–2 weekends. Declutter, organize, swap soft goods, add a magnetic strip and some under-cabinet lights. Total spend usually lands between $150 and $500.
Renter-friendly upgrades: 2–4 weekends. Peel-and-stick backsplash, new cabinet hardware, an open shelf or two, a rolling cart. Plan around drying time and shipping.
Full cosmetic refresh: 2–6 weeks once you factor in lead times. Paint, lighting, faucet, compact furniture. Real budgets here:
– Cabinet organizers, dividers, under-shelf baskets: $10–$35 each
– Magnetic knife strip or IKEA-style rail system: $15–$35
– Peel-and-stick tile: $6–$12 per sq ft (a tiny kitchen needs 10–25 sq ft, so $60–$250 total)
– Under-cabinet LED strips or puck lights: $20–$80
– Narrow rolling cart: $80–$300
– Apartment-size 24″ fridge: $500–$1,400
– New pull-down faucet: $80–$250
If you’re going further — custom cabinet inserts, an 18″ dishwasher, a slim induction cooktop — you’re looking at $4,000 to $15,000+ for a full small-kitchen renovation.
– Beginner: decluttering, peel-and-stick anything, pegboards, rails, hooks
– Intermediate: floating shelves into studs, faucet and hardware swaps, hardwiring under-cabinet lights
– Pro territory: anything involving moving appliances, electrical work, or new countertops
Picking a Look That Won’t Fight the Square Footage
A small kitchen punishes indecision. Pick a direction and commit. These are the styles that actually hold up at this scale:
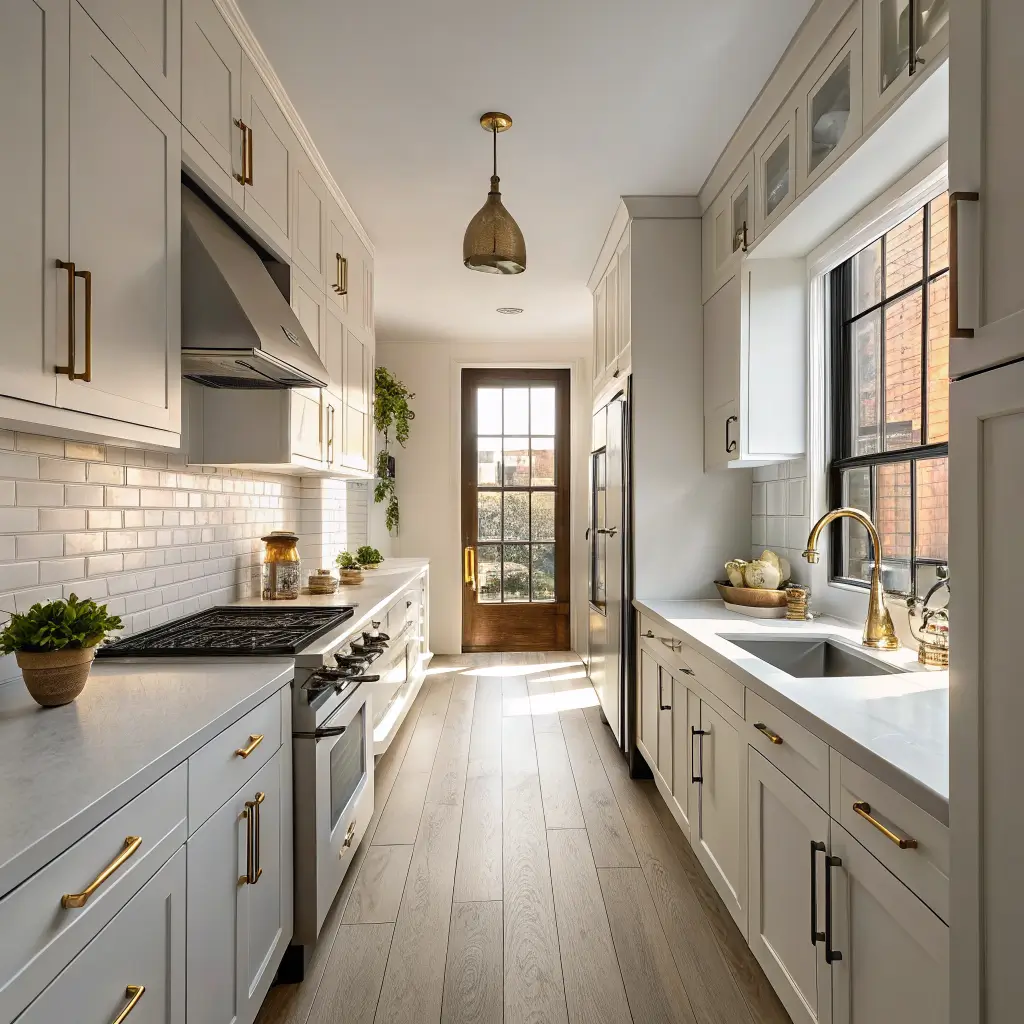
– Scandi-minimalist: matte white fronts, light oak or birch accents, integrated or slim black pulls. Light bounces around, which is the whole point.
– Japandi: warm neutrals, natural wood, simple black hardware, edited open shelving. My personal favorite for tight spaces because it doesn’t read sterile.
– Urban modern: flat-panel cabinets, concrete-look counters, black stainless or matte appliances. Looks great with one strong pendant.
– Compact farmhouse: shaker doors, warm brass pulls, a stretch of butcher block. Skip the apron sink unless you actually have the run for it.
– Maximalist micro-kitchen: bold backsplash, colored cabinets, but with strict editing on what’s left out on the counter. High-risk, high-reward.
Colors and Materials That Earn Their Spot
For cabinets, I keep coming back to a few:
– Soft whites like Benjamin Moore Chantilly Lace or Sherwin-Williams Extra White. They reflect light without going cold.
– Greige and putty tones in the Revere Pewter range when you want warmth without losing brightness.
– Muted sage or olive on lowers with white uppers — currently the small-kitchen color combination I see working over and over.
– Deep navy or charcoal on base cabinets only, paired with a light counter and backsplash.
For counters, quartz in a soft stone pattern or high-pressure laminate that mimics terrazzo gives you a calm surface that won’t visually shrink the room. A small stretch of butcher block on a cart or island top adds the warmth your eye is craving.
For backsplash, white or cream subway tile with matching grout reads cleaner than contrast grout in a tiny space. If you want pattern, use it in a single zone (behind the stove) and keep everything else quiet. Zellige-style tile in a 4″×4″ works beautifully in small runs.
Metals: brushed brass, matte black, or brushed nickel. Mix two finishes maximum. Three is chaos at this scale.
The Pieces That Actually Make a Tiny Kitchen Work
This is where I see people go wrong — buying cute decor before solving the storage problem. Storage first. Decor is a reward.
Hero pieces that free up counter space
– Narrow rolling cart or island — 16″–24″ wide, 20″–30″ deep, 30″–36″ high. Shelves below, hooks on the side, ideally a butcher-block top so it doubles as prep.
– Wall-mounted rail with S-hooks for utensils, mugs, small pots. IKEA’s KUNGSFORS system is the easiest version. Mount it at 52″–60″ off the floor depending on your height.
– Pegboard for tools and pans. Great over a desk-style kitchen wall if you’ve got one.
– Drop-leaf or wall-mounted table that folds to 4–6″ deep and opens to 20–30″ for prep or dining. This is the move for studios.
– Slim rolling pantry — 10″–16″ wide — that slides between the fridge and the wall. Mine holds spices, oils, and dry goods I’d otherwise have nowhere for.
Organization that prevents future chaos
– Magnetic knife strip (counters and drawers gain instant real estate)
– Under-shelf hanging baskets inside cabinets
– Lazy Susans for corner cabinets and high shelves
– Clear stackable bins in the fridge and pantry
– 4–6 matching canisters in glass or matte ceramic for daily-use dry goods
Decor that won’t add clutter
One ceramic utensil crock. One tray vignette by the stove with oil, salt, pepper, and a small plant. A 2’×6′ or 2’×8′ flatweave runner that you can throw in the wash. Coordinated towels in your accent color.
That’s it. Resist the urge to add more.
How to Actually Put It Together
Step 1: Empty everything
Counters down to bare surface. Pull rarely used gadgets out of cabinets. Apply the one-in, one-out rule to mugs, water bottles, and food storage. I did this and got rid of 23 mismatched containers. Twenty-three.
Step 2: Measure every inch — including the weird ones
Measure counter runs, cabinet interiors, and the spaces between things. The gap between fridge and wall. The side of an end cabinet. The wall above the fridge. Those are your dead zones, and they’re where rails, slim pantries, and hooks go.
Step 3: Place hero pieces with real clearance
Rolling cart goes near your main prep zone with at least 30″ of walkway around it (36″ is more comfortable if you can spare it). Rails go at reachable height. Under-cabinet lights go where you actually prep — by the stove and sink — not where they’d look prettiest for a photo.
Step 4: Style from largest to smallest
Appliances, then organizers, then decor. Decor last, always. If you style first, you’ll end up rearranging it three times when you realize the toaster has nowhere to live.
Zone the kitchen
Prep, cook, clean, coffee, storage. Everything related to coffee lives in one spot — beans, grinder, mugs, filters. Everything baking-related lives in one cabinet. You’ll stop opening four cabinets to make breakfast.
Cap each counter run at 3 functional items max. Coffee maker, crock, canister set. That’s a run. Anything else lives in a cabinet.
Pro Styling Moves
Layer textures, not patterns
Aim for 3–4 texture types in the room: matte cabinet, warm wood, smooth stone or laminate, soft textile. That’s enough variation. Pattern lives in soft goods you can swap — a runner, towels — not in your permanent finishes.
If you go bold with patterned tile or wallpaper, your counters and cabinets stay solid. Always.
The 60/30/10 color rule
– 60% light neutral (walls, main cabinets)
– 30% secondary neutral or soft color (lowers, counters)
– 10% accent (textiles, art, maybe one colorful small appliance)
If your cabinets are dark, your backsplash and counters need to be light and reflective or you’ll end up in a cave. I painted a kitchen “Hale Navy” all the way around once. It looked incredible at night and like a submarine at 8 a.m. I repainted the uppers white within a month.
Pick one hero, quiet the rest
One focal point. Backsplash, open shelf, or a pendant. Everything else stays calm. Closed storage, plain containers, minimal counter stuff.
Use vertical lines to lift the ceiling. Tall pantry units, stacked shelves, vertical tile patterns. Your eye follows them up and the room feels taller than it is.
The Mistakes I See (and Made)
Overloaded open shelves. Keep 20–30% of shelf space empty. Group by color. Never store original packaging on open shelves — decant or hide it.
Every appliance out at once. Pick multi-use where you can (toaster oven that air fries, immersion blender that whisks). Stand mixers, slow cookers, and waffle irons go in a closet.
Dark finishes everywhere. Dark cabinets need light counters, light backsplash, and serious task lighting. Otherwise it’s a cave.
Ignoring vertical space. Ceilings are storage. Above the fridge is storage. The side of a cabinet is storage. If you’re not using it, you’re losing it.
Decorating too hard. Cap purely decorative objects at 2–3 pieces total in a tiny kitchen. Make the rest of your “decor” functional — pretty cutting boards leaned at the backsplash, attractive bowls, glass canisters.
Keeping It Looking Good Past Week One
Pick a temperature for your neutrals and stick to it. Warm whites with warm woods, or cool whites with cool grays. Mixing yellowed whites with cool grays makes everything look dingy, especially under cheap kitchen lighting.
Repeat finishes. If you use oak once, use it twice. Cart top and cutting boards. Floating shelf and a wooden bowl. Repetition reads as intentional.
Do a weekly counter reset — clear everything back to baseline. Keep a donation box in a closet for the mugs and gadgets you keep meaning to deal with.
Hide the ugly essentials behind closed doors. Plastic containers, snack packaging, vitamin bottles. Open storage is for things that look good.
Cheap Updates That Punch Above Their Weight
Swap the runner and towels seasonally — $15–$60 and the whole room feels different.
Paint just the lowers or just the cart. You’ll use half the paint and get a real shift.
Replace hardware and the faucet before you ever consider replacing cabinets. Solid brass or matte black pulls run $3–$10 each, and they make builder-grade cabinets look custom. A new faucet with a pull-down sprayer at $80–$250 changes the whole sink area.
Peel-and-stick a backsplash behind your open shelves only. Less material, less commitment, big visual payoff.
Two cross-style combos worth trying
Boho-Coastal: white or sand cabinets, light counters, woven baskets on top of the fridge, a jute runner, sea glass green and blue in dishware and art. Keep the counts low — one basket, one runner, two pieces of art.
Japandi-Farmhouse: shaker cabinets in warm off-white or light mushroom, black hardware, oak open shelves, stone-look counters. One small vintage rug. One large wooden bowl on the counter. Nothing else.
The smaller the kitchen, the more every single object has to earn its place. Once you accept that, the design part gets easy.
Conclusion
The tiny kitchen that worked for my friend was under one hundred twenty square feet with a single counter, a two-burner stove, and a mini fridge. She had hung a pot rack from the ceiling, added a fold-down table for prep, and kept a magnetic knife strip on the wall. The room was not a chef’s kitchen. It was a kitchen for one person who liked to cook. And that was exactly what it was.